Table of Contents
MMAX2
Tutorial by Sabine Bartsch and Fenja Kastendiek
TUTORIAL STATUS: under revision
1 What is MMAX2?
MMAX2 is a tool for multilayer annotation of natural language text. It is especially suited to the annotation and visualization of links between linguistic elements at the level of the text or discourse such as for example cohesive ties. MMAX2 is highly configurable and allows users to define their own annotation schemes.
MMAX2 is a Java-based annotation tool that can be used on different operating systems. This tutorial guides users through the process of installing MMAX2 including its system requirements and the configuration of the annotation schemes.
2 Installation and requirements
System requirements
Requirements: MMAX2 requires Java. As many programs in corpus and computational linguistics require Java which is widely used in this field, it is advisable to install a full Java JDK (Java Development Kit) which also includes the JRE (Java Runtime Environment). Please consult the following page to download software that is required for many corpus and computational linguistic applications: System Requirements.
Important note: MMAX2 requires Java 8 (Java version number 1.8.xxx). It will not work with the more recent Java 11 LTS.
Installation
MMAX2 does not require much of an installation. The following steps get you started in no time at all.
- Download the latest version from the following website: http://mmax2.sourceforge.net/
- Unzip the .zip file to a directory of your choice. Please make sure that the directory name contains no white space and that the path is not too long as this can cause problems keeping track of files and making backup copies.
- Start MMAX2 by double clicking on or otherwise executing the batch file uner Windows-type operating systems:
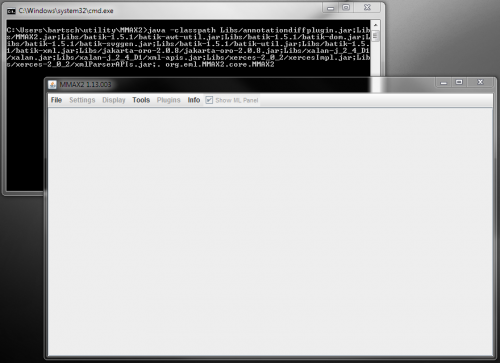
startmmax.bator the shell file under UNIX-like operating systems (Linux etc.): startmmax.sh - This opens the - very empty - main MMAX2 window as well as a box with the shell in the background which needs to be kept running and open for as long as MMAX2 is being used. If there are two windows open on your screen which roughly looks like this (see screenshot below), you've mastered the first step towards using MMAX2.
- You are now set to try your first sample project!
3 Sample project
One of the major strengths of MMAX2 is its flexibility and configurability. You can define your own annotation schemes as well as the way relations and links between linguistic objects are rendered at the surface. MMAX2 offers nice visualizations suitable for the annotation of relations especially at the discourse level such as cohesive chains etc. However, this configurability can be a great obstacle for users familiarizing themselves with MMAX2 for the first time. The configuration pane has many options and requires careful planning especially for users who are new to the software. We have therefore opted to get users started by means of a sample project to give them a feel for the functionality and usefulness of the software before they delve into the intricacies of multi-layer discourse annotation.
The sample project is taken from a project conducted with students working on the ObamaSpeechesCorpus (OSC). You can download the following zip file, unpack it to a directory of your choice and get started according to the following instructions.
1. Download the sample project file
2. Unpack the zip file to a directory of your choice.
4 Annotation with MMAX2
Cohesion annotation with MMAX2
The task that MMAX2 is most suitable for is the annotation of discourse relations especially the annotation of cohesive chains. This is the task that is exemplified by the sample project you just downloaded. When you click on a word that is a constituent of a lexical chain, you see a visualization of the chain between all elements the word is related to. The following screen shot shows the three MMAX2 windows that are open whenever you are annotating text.
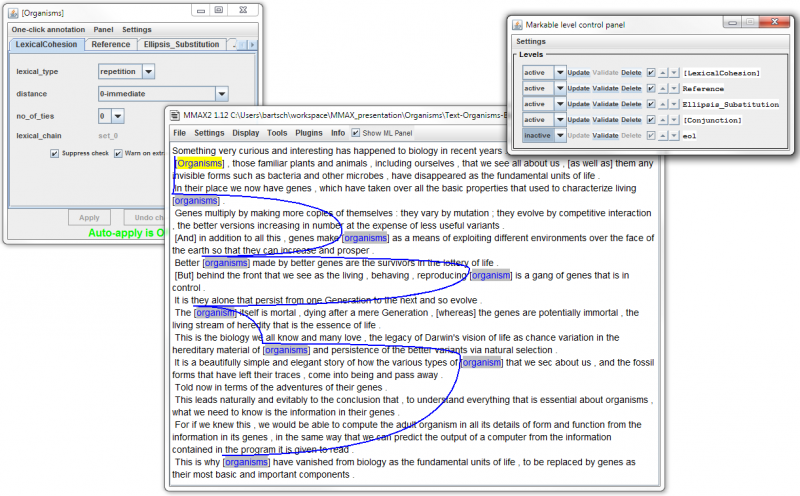
Figure 2: MMAX2 annotation windows
The three windows shown have different functions: The large window in the middle is the actual annotation window in which annotations are created. The smaller window to the left makes available the classes of annotation units defined by the user in the annotation scheme. The smaller window on the right entitled “Markable level control panel” controls whether individual annotation layers are active or passive, it can also delete whole annotation layers, so use this with caution. Generally, the settings for the annotation layers are okay and do not require user intervention, however, the settings for the last line “eol” should be set to “inactive” in the drop-down box on that same line to the left. This setting toggles, how “end of line” break settings are handled and as we typically want to see running text when working on discourse phenomena, the setting “inactive” does the trick.
Adding to existing annotations
A good way to start working with MMAX2 annotation is to add to the sample project. We have included only minimal annotations, so you can experiment with and add to those annotations to get a feel for the user interface. In order to add further items to a chain, click on an already existing item in the chain such that it is highlighted, then select the item you would like to add to the chain, right-click on the item with the mouse and select “Add to this markable” from the context-menu that opens up.
Adding a new lexical chain is just as simple:
1. Select the first item in the chain
2. From the opening context menu, select the type of chain you are planning to annotate.
2.1 In our sample project, the choices offered are the following:
- Create markable on level 'LexicalCohesion'
- Create markable on level 'Reference'
- Create markable on level 'Ellipsis_Substitution'
- Create markable on level 'Conjunction'
2.2 This first selection sets the item that is the starting item in your chain.
3. Select the first item of the chain that you have just created.
4. Select the next item in the text that you want to include into a chain with the first item by pulling the mouse over a single word or a consecutive group of words. It is important in this step to not select a word by double-clicking, as this will create an initial item starting a chain instead of selecting an item to be added to a chain. A context menu will open up that offers you to “Add to this markable”.
Configuring MMAX2 for cohesion annotation
When you want to modify a cohesion scheme for the first time, it is advisable to take an existing scheme and to modify this according to your requirements (especially if you do not have any knowledge of XML, basing your annotations on a existing scheme is a whole lot simpler) . When you download MMAX2, it already contains a Samples folder. To look at a German example text open the folder HTC (Heidelberg Text Corpus). In the folder Schemes you can look at the cohesion schemes they created for their example and in the folder Customizations you find the customization files. The file common_path.xml is in the HTC file.
No explanation is offered at this point on how to create or modify these schemes and customization files:
1. Annotation schemes
An annotation scheme defines the attributes, values and relations of markables you want to create. The scheme file format is XML. You can open an XML file in a simple text editor as provided as a default by your operating system (note that these generally do not provide advanced features such as code highlighting etc., so better choose a more advanced editor such as Notepad++, Sublime Text or the Oxygen XML editor).
You can find further information about annotation schemes in your MMAX2 folder under Docs. Take a look at annoschemes.pdf. In the following, only the main parts of an annotation scheme will be exemplified.
It is important to distinguish between attribute types and relation types. Attribute types allow choosing between free text, buttons and lists to store the information. The German example allows you to choose the grammatical roles as buttons. Lists can be useful when you have many values to choose from.
There are two relation types to choose. Markable_sets allow to group two or more markables together (having only one ID). Markable_pointers allow you to point from one markable to one or more other markables.
Take a look at the following example (it is an extract of the _coref_scheme_ contained in the HTC folder).
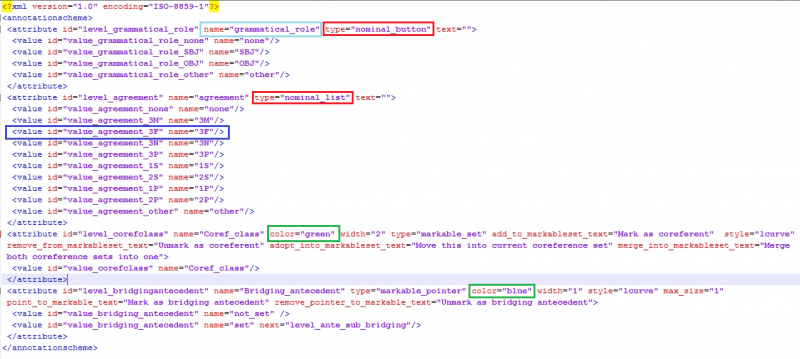
As you can see, inside the annotation scheme you have the attributes. They always need an id, a name (as highlighted in light blue), a type (highlighted in red) and they may contain some information in text. As type attribute you can assign nominal_button or nominal_list. The attributes get values which also need an id and which get a name. The name you give your value will appear in the MMAX2 annotation window next to your button or in the drop down list. You can add as many values as your annotation task requires.
For markable_sets or markable_pointers you also have to write a new attribute. This one however needs more information than the attributes like nominal button. The types are markable_set or markable_pointer. As MMAX2 presents these with a connecting line, you can choose the color of the line, its width and its style. With _add_to_markableset_text=_, _remove_from_markableset_text=_, _point_to_markable_text=_ and _remove_pointer_to_markable_text=_ you can indicate the text that will be shown to choose an action when you annotate your text. The relation attributes also have values to which you have to assign a name. For a complete list of all values of an attribute, see _annoschemes.pdf_ in the _Docs_ file.
2. Customization schemes
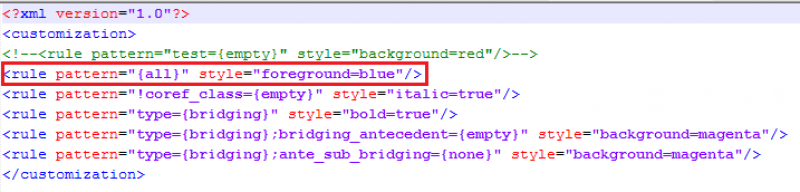
A customization schema defines what your markables and your text will look like. The default value for your text is black, so everything that has no markable will be black. The value _pattern_ indicates which part of your annotations will be concerned by the value _style_ you can change. The value _foreground=blue_ indicates that every pattern chosen will be marked in blue. But you can also set your markables to italic or bold.
3. The path file
The path file must contain the name of your annotation scheme or schemes and of the customization scheme or schemes. You can indicate the basedata_path, the customization_path, the scheme_path, the style_path and the markable_path, but you don't have to. You can add your own stylesheets, but it is also possible to use the _default_style.xsl_. You add your annotation schemes by indicating the annotation level name, the name of your schemefile and of your customization file. You may want to use an already existing path file and change the components you need for your project.
Text input to MMAX2
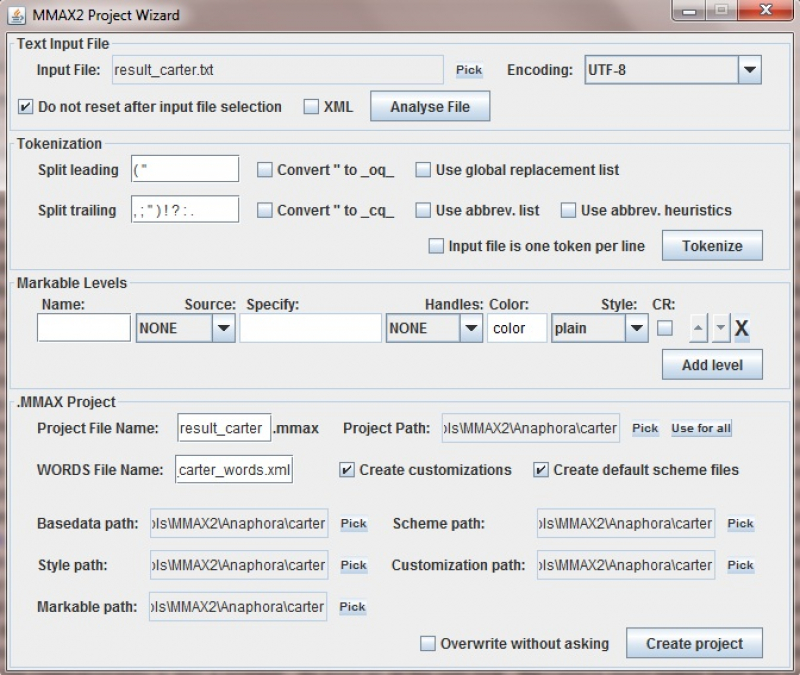
MMAX2 only accepts data in its own format (mmax). To create a file in this format, open _Tools_ in the main bar and choose _Project Wizard_. This will display the following window:
- Choose the file (in txt or XML format) you want to convert to mmax format. Then choose the correct encoding.
- Mark _Do not reset after input file selection_ and click on _Analyse file_.
- Click on _Tokenize_ and check whether your text is correctly tokenized by displaying the list of tokens.
- Add a markable level by clicking on _Add level_.
- Some small boxes will appear which can stay empty as you created your markable levels in the XML files and the stylesheet.
- Give your project a name and choose your project path. It is useful to create a folder for each text you want to work with in MMAX2 because MMAX2 will create some files referring to your text.
- By selecting _Use for all_, the project path you indicated will be used for all files MMAX2 will create for your project.
- Do not select _Overwrite without asking_!
- Create your project.
The following window will appear:
Choose No as you want to keep the common_path file you have created before, indicating your stylesheet and your cohesion scheme. You can now load the file into MMAX2 and start working on your annotation task.
5 Extracting results from MMAX2
MMAXQL: The query language of MMAX2
MMAX2 ships with its own annotation query language called MMAXQL. MMAXQL allows you to perform queries on annotated MMAX2 documents in the query console, for detecting, browsing and quantifying markables with certain features. You can find the query console in the toolbar under _Tools_.

The generic syntax for an MMAX2 query is the following:
=command !attributes {level_name} [condition];=
Note that a query statement is always closed by a semicolon. MMAXQL knows three different kinds of command: _display_, _statistics_ and _let_. The _display_ command shows the result of your query in a window below the query console. The _statistics_ command displays some simple descriptive statistics about your annotation in the statistics tab. Finally, the _let_ command assigns your query result to a variable.
The attributes parameter is optional and always has to be included in square brackets. It allows you to specify which attribute values will be displayed in the query result window and to constrain the statistics report. The command part can be followed by an expression referring to the markable level to which the query is to be applied. Markable levels are identified by their names. The condition part is optional and can be the most complicated part of a query, but it allows narrowing down the results returned to the _command_. The condition specifies matching conditions the markables must fulfill in order to be displayed. For querying the attributes you give its name and one or more values to match. The values have to be written in curly brackets, the attribute in parenthesis including the values:
=display coref (semantic_class={phys_obj, other});=
This is an example query for the document contained in the HTC folder. It displays the level name _coref_ and takes as attribute the _semantic_class_ but only considers results being either a _physical object_ or _other_. The following query gives the statistics about the before mentioned query:
=statistics coref (semantic_class={phys_obj, other});=
You can integrate regular expressions into your query. Conditions can be negated: the following query only looks for values that are annotated neither as _phys_obj_ nor as _other_.
=display coref (!semantic_class={phys_obj, other});=
MMAXQL has the special attribute _markable_text_ which is available on all markable levels. It allows the formulation of conditions based on the strings that make up the markable. The following query looks in _sentences_ for the string _das_.
=display sentences (*markable_text={.*das.*});=
By integrating regular expressions you can formulate more complex queries. The following example looks for all occurrences of numbers in the HTC document:
=display sentences (*markable_text={.*[0-9]+.*});=
If you are not familiar with regular expressions, take a look at the regular expressions tutorial: regular expressions
6 Summary
MMAX2 is especially suited for discourse annotation tasks. Its main advantages are its flexibility and configurability as well as the visualization of the discourse relations. Also, its configuration and annotation files are stored in xml, so are amenable to further processing outside of MMAX2 and are human readable. Having said that, its configurability is also the greatest obstacle to getting started with MMAX2 as can make it difficult for inexperienced users to use the tool out of the box. It is therefore a good idea to start students and other first time users off with an example of a finalized project to get a feel for what it is capable of.
Video tutorials
MMAX2 video tutorial in English / Fenja Kastendiek
 Except where otherwise noted, content on this wiki is licensed under the following license: CC Attribution-Share Alike 4.0 International