Site Tools
Table of Contents
Weka: Data Mining Software in Java
Introduction
Weka is a software for data mining. Many algorithms such as Naive Bayes or decision trees are implemented in the software and can be used for many different NLP tasks. Weka contains tools for pre-processing, clustering, classification or visualisation. So with Weka you can preprocess a dataset, feed it into a learning scheme and analyze the performance of the used classifier, without writing any programm code at all. For exact details, see the Weka homepage.
This tutorial first introduces the main parts of the sofware as they can be chosen from Weka's GUI Chooser. Weka is then further introduced with the help of two application examples: Sentiment analysis and named entity recognition.
Installing and starting Weka
You can download Weka from its download page. Choose the right software for your system and check whether you have already installed the Java Virtual Machine (VM). Choose the appropriate executable and install it on your machine.
To start Weka, open the command line, change to the directory you have installed Weka in and type in:
java -Xmx2G -jar weka.jar
The command -Xmx2G provides the working memory Weka can use. If you do not define it, the default will be used. For tasks needing much processing power, you can increase it depending on your working memory.
The GUI Chooser
When you have typed in the command, the GUI Chooser of Weka will open.
Once you have selected one of the tools, its button will be greyed out. Weka provides the Explorer, the Experimenter, the Knowledge Flow and the Simple CLI interfaces.
The Explorer:
The Explorer contains Weka's main features such as pre-processing, classification, clustering, attribute selection and visualisation. Thus, if you work with Weka for the first time and if you want to read in data and classify it, you will work with the Explorer.
The Experimenter:
The Experimenter allows can be used for systematic comparisons of Weka's machine learning algorithms.
The Knowledge Flow:
The Knowledge Flow contains mainly the same features as the Explorer but it allows you to create a knowledge flow from pre-processing to visualisation which is visualised by icons and which can be saved to redo it easily with other data sets or other settings.
The Simple CLI:
The Simple CLI is a Weka command line which separates command line and output. Via the Simple CLI you have access to all Weka classes.
The Explorer
When you open the Explorer, you have acces to many features of Weka. At first, all tabs except the first one are greyed out because you have to load in data before you can explore it. The Explorer's tabs are the following:
- Pre-process: You can load in and pre-process the data you want to work with
- Classify: You can choose the classifier and train a model or test an existing one
- Cluster: You can learn clusters for the data
- Associate: You can use association rules for the data and learn them
- Select attributes: You can find out about the most informative features of your data
- Visualize: You can plot your data to get information on it
The pre-process tab
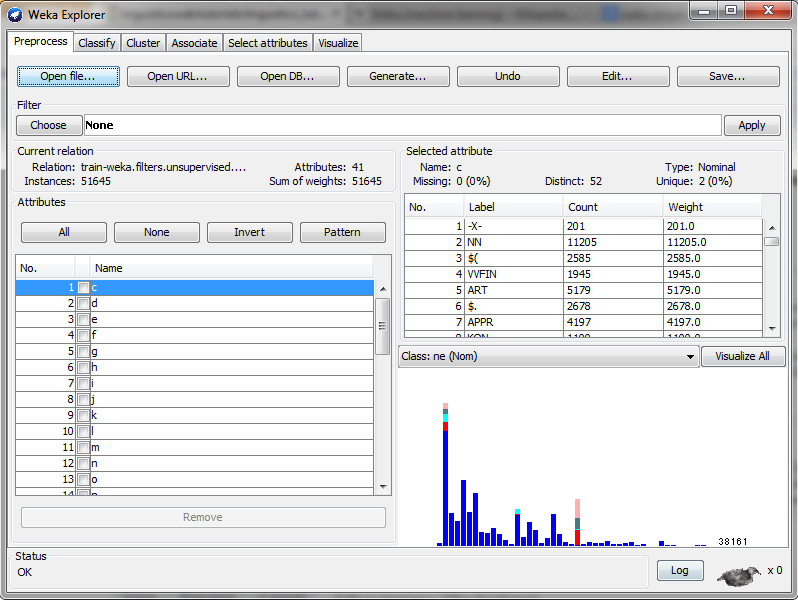
To load in data, click on Open file… and choose the file you want to load in (in Weka, you can also load in data from an URL or from a data base). Please note that Weka cannot read in all data types. Weka is made to process only arff files (Attribute-Relation File Format), which is an ASCII text file describing a list of instances which share a list of attributes. But Weka offers a tool to transform csv files into arff format, the csv loader (see chapter The CSV Loader).
Once you have loaded in your data, Weka displays your attributes' names in the small attribute window. In the section selected attribute on the right side you get information about the attribute such as its type and name. In some data formats, Weka can display the number of your attributes in the window below the selected attribute section. Please note that Weka is not able to display your attribute if it is in string format and if you have a great number of strings.
The CSV Loader
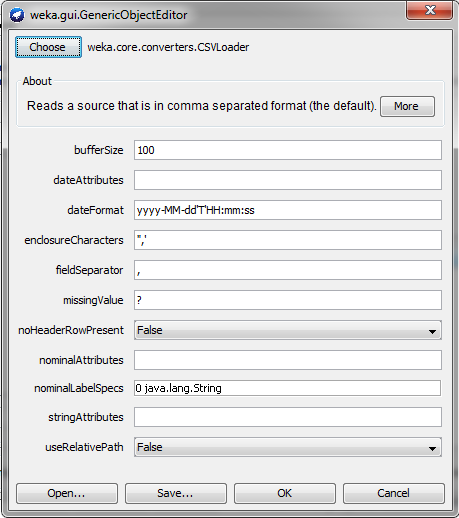
When you try to read in a csv file Weka will launch an error message either stating that it cannot determine the file loader automatically and invites you to choose one yourself (so you can choose the csv loader) or stating that Weka was not able to recognise the file as csv file and offering you to use a converter.
In this window you have to specify the field separator which is used in your csv file (comma separated is recommended as this is what Weka expects) and the enclosure characters used in your csv file. The enclosure characters are especially important when you want to read in a file containing text because the strings might contain commas. If these commas are not marked by enclosure characters, Weka will recognise the comma as field separator and throw an error message staiting that it expected a certain number of elements in one line but that it found more than the expected number - due to commas not marked with enclosure characters. So note that the csv file you want to read in contains always the same number of rows per line as Weka expects it to be so. If one or more values are missing in one line, Weka will throw an error message. In case you have cases where you do not have values for one attribute, mark it with a question mark, but do not let the row be empty.
Weka also expects to find the names of your attributes in the first line of your csv file. It automatically reads them in and shows them in the attribute window. So if you want to do named entity recognition with Weka you will read in a file which contains for example the word, the PoS tag and the named entity tag. Therefore, the first line of the csv file is something like word,pos,ne to give Weka the names of the attributes.
The filters
Weka offers you a great number of filters to pre-process your data. This tutorial cannot treat all of them, but there is one that may be of importance for linguists working with Weka. It is the StringToNominal filter which turns attributes provided as strings into a predefined set of values, which can be useful for PoS tags, chunk tags or many other kinds of tags because they build a predefined set. It can be very important to transform those tabs into nominal values because many algorithms cannot process strings and therefore need nominal or numeric values.
To apply a filter, click on Choose in the filter section in the preprocess tab. You can then choose among supervised and unsupervised filters, than among attribute and instance. The StringToNominal filter is an unsupervised one which processes the attributes. Once you have selected a filter, right click in the small window containing the filter's name, then choose Show properties…. Here you can specify the range of attributes which you want to transform.
When you have transformed your attributes, you can save the file with the new attribute formats by clicking on the button Save… on top of the window.
The classify tab
Training a model
Once your data is read in correctly, you can start to train a model.
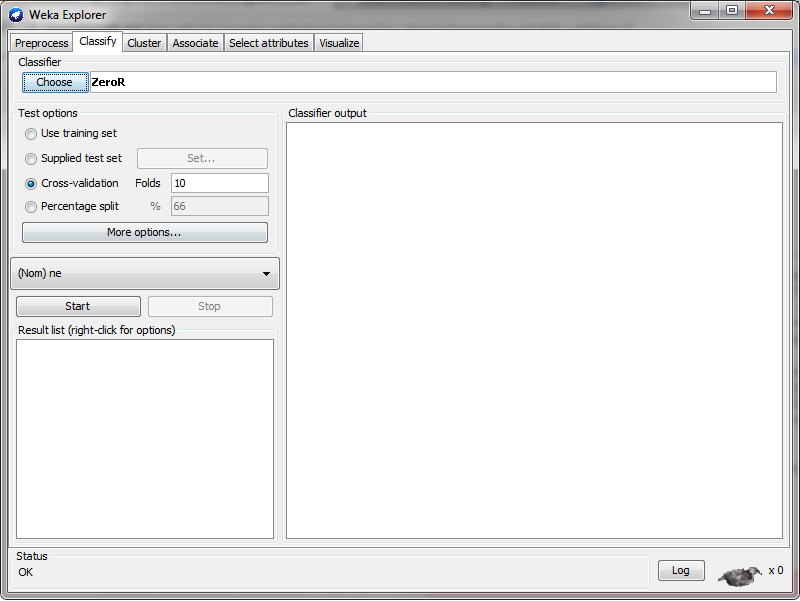
You first have to choose a classifier. The choice of your classifier depends on the task you want to perform. In computational linguistics, often used classifiers are Support Vector Machines (SMO in Weka, for example for sentiment analysis) or decision tree algorithms (for example C4.5 (J48 in Weka) for named entity recognition). When you have chosen a classifier, you can define its further settings by right clicking on the window containing the algorithms name.
To train your model, you have to specify whether you want to train it using cross-validation or by splitting your data and taking one part of it as test set. If your data set is small, it is advisable to use 10-fold cross validation. By clicking on the button More options you can specify further output settings, for example the output predictions as plain text, XML or csv format.
In the drop down menu, choose the attribute the classifier shall train on. As default, always the last attribute is selected. Click Start to train your model.
Once Weka has trained a model, it is displayed in the small window on the left side and its result is shown in the large window on the right. As result, you get a confusion matrix displaying your classes and as which class they have been recognized. Furthermore, you get some statistics containing among others precision, recall and f-measure of your model.
To save your model, right click on the model's name in the left window and click Save model.
Testing a model
To test the model you have built, you need a test set or a development set. Read them in as you have done with your training data. It is important that training and test data contain the same attributes, the same values in the attributes and that the attributes' values are listed in the same order. If this is not the case, Weka will throw error messages stating that training and test set are not compatible.
Load the model you have built by right clicking in result list in the classify tab. Click Load model and chose the model you have trained. Then tick Supplied test set in top of the window on the left. Once it is ticked, the Set button that has been greyed out can be clicked and allows you to open a file or an URL to choose the test data you want to test your model on. Choose your file, then choose the attribute you want to test the model on by selecting it from the drop down menu. Then close the window. To start the evaluation process, right click on your model in the Result list section and choose Re-evaluate model on current test set. The process will start, the result will be displayed in the window on the right.
The Select attributes tab
This tab allows you to find out which features are more informative than others in your feature set. You have to choose an evaluator and a search method. Once you chance either the evaluator or the search method, you may get the message that both are not compatible. Weka will propose to choose an evaluator or a search method that works with the one you have chosen. If you confirm this proposal, you can choose whether you want to evaluate the attributes on the full training set or by cross-validation. Once you click the button Start, the evaluation will start.
Depending on the evaluator and the search method you chose, you will get a ranking or a number of attributes in the window on the right, which were found helpful for your task.
References
Garner, Stephen R. (1995): WEKA: The Waikato Environment for Knowledge Analysis. In: Proceedings of the New Zealand computer science research students conference, p. 57-64.
Hall, Mark / Frank, Eibe / Holmes, Geoffrey / Pfahringer, Bernhard / Reutemann, Peter / Witten, Ian H. (2009): The WEKA Data Mining Software: An Update. In: SIGKDD Explorations, Volume 11, Issue 1, p. 10-18.
 Except where otherwise noted, content on this wiki is licensed under the following license: CC Attribution-Share Alike 4.0 International


