Table of Contents
UAM Corpus Tool
| Related tutorials |
|---|
| UAM Corpus Tool |
| UAM Corpus Tool - Autocode Function |
| UAM Corpus Tool Export |
1 What is UAM Corpus Tool?
UAM Corpus Tool comprises a set of tools for linguistic annotation of texts which can be done manually and semi-automatically. The application allows searching your texts for words or certain features, e.g. passive constructions and provides statistical analysis of your data.
UAM Corpus Tool is developed by the computational linguist Mick O`Donnell who has also developed the application Systemic Coder for text annotation. UAM Corpus Tool can be seen as a more powerful extension of Systemic Coder; in contrast to its predecessor, it provides functionalities for coding several documents at multiple annotation layers as well as an auto-coding function and evaluation and visualization functions.
UAM focuses on manual as well as semi-automatic annotation. Some linguistic patterns, e.g. semantic or pragmatic features cannot be easily identified automatically. Furthermore, sufficient language resources necessary for appropriate automatic annotations are not available for numerous languages (O`Donnell, 2008).
The developer describes the main audience of the UAM Corpus Tool as users without further programming knowledge, “a linguist or computational linguist who does not program, and would rather spend their time annotating text than learning how to use the system” (O` Donnell, 2008).
2 Current Projects
The research group WOSLAC (Word Order in Second Language Acquisition Corpora) at the English Department of the Universidad Autónoma de Madrid Spain investigates how second language learners acquire the word order of a new language. The project uses written learner corpora containing data of learners of English and Spanish, which are annotated and analyzed by means of UAM Corpus Tool.
Another example for the application of the UAM Corpus Tool is the EDNA Corpus (Englische & Deutsche Newsgroup-Texte – Annotiertes Korpus). It consists of newsgroup texts which are taken from the internet and deal with the two topics relationship problems and eating disorders. The EDNA Corpus was annotated and analyzed concerning linguistic features of this text genre with respect to the different languages.
3 Installation and Requirements
The tool is available free of charge for both Windows and Mac OS. You can download the current versions (Windows: 2.8.14, Mac: version 2.8.16) via this website for your operating system. You have to double click on the downloaded application (Microsoft Windows users take the “exe”-file) and follow the installation instructions. As a result the tool should be saved to a folder on your computer. Furthermore, the application contains a manual for further support.
Earlier versions are developed for text and image annotation. Since 2010, there is a separate application available designed for image annotation, the UAM ImageTool.
4 Running the application
After starting the application, a window appears which offers you the possibility to open an already existing project or to create a new one (see Screenshots 1 and 2 below). In order to understand the functions of the tool, we will create a project for analyzing two newspaper articles dealing with the case of Dominique Strauss-Kahn, the former head of the International Monetary Fund (IMF) who was charged with sexual assault and accused of having raped a female hotel employee in New York City:
“Dominique Strauss-Kahn pleads not guilty to rape charges” (Rushe, 2011) published in the English Guardian
“Strauss-Kahn erklärt sich für nicht schuldig” (Heil, 2011) published in the German FAZ.
To create a new project we have to provide a name for our project, for example, ExampleAnalysis and we have to specify the location where we want to save the project folder. The project folder contains several folders where your analysis, texts, schemes and results are organized later on.
The so-called project window (Screenshot 1) is the main window of the UAM Corpus Tool and helps to organize your data effectively.
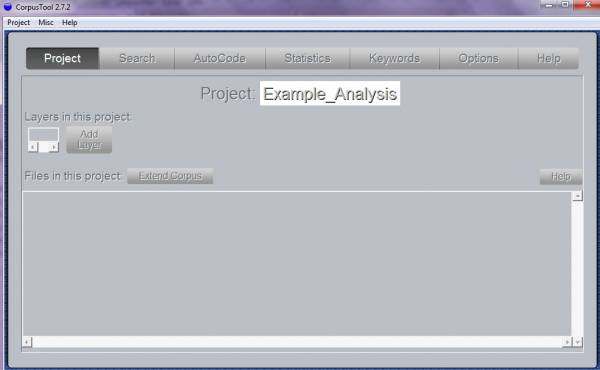
Screenshot 1: Project Window
4.1 Add a file
You can add a file by clicking the button Extend corpus.
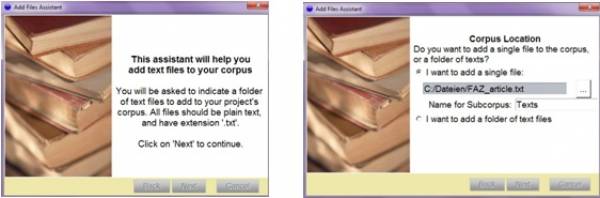
Screenshot 2: Extend Corpus
Texts can only be added as plain texts. Files in plain text format usually have the extension .txt. Currently, the UAM Corpus Tool does not handle formats such as PDF, RTF and XML excluding Microsoft Word documents. If the text you are interested in is, for instance, a Microsoft Word document you can simply copy the content, past it into a new text file in your editor (e.g. Notepad) and save the file using the extension .txt or you can save the whole Microsoft Word document as .txt file.
It is possible to add only one single file or a whole folder if you have saved your data together in one folder on your computer (Screenshot 2). You can further organize your data by using subcorpora. Thereby you can, for instance, separate texts and images. A subcorpus named texts is automatically provided. You can rename but not remove it because data cannot be added without a declared subcorpus.
After clicking Next you have to confirm your selection by clicking Finalise in the following window.
Of course, this process of adding single files or whole folders can be repeated by clicking Extend corpus.
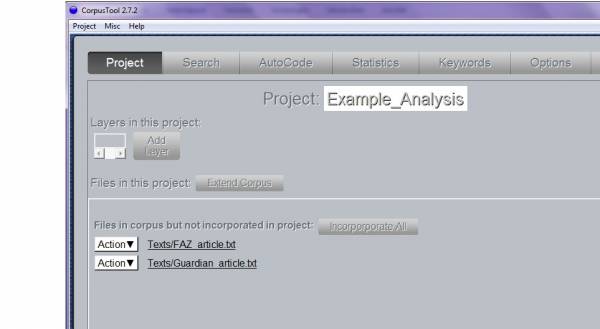
Screenshot 3: Project Window with Corpus
The files, which are added to your corpus, are listed in the project window (Screenshot 3). The next step is adding them to your project by clicking Incorporate All.
In a next step, a window appears (Screenshot 4) where you can edit the metadata describing your file. This includes information concerning language, language encoding and font as well as size of the font. The specification of the language is important because depending on that information the application uses the respective language resources, e.g. lexicons and parsers. Currently, only English is fully supported.
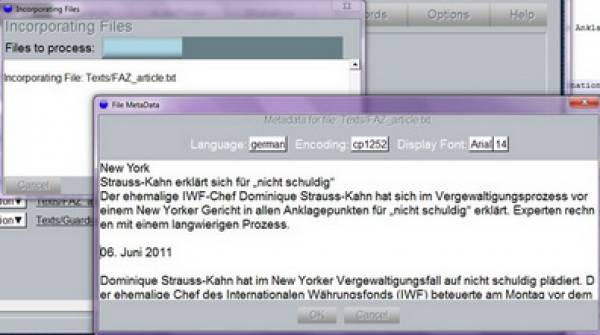
Screenshot 4: File Metadata
The button Action next to each file provides numerous functionalities summarized in table 1:
| Button | Functionality |
| Change metadata | Edit language, encoding, font and font size. |
| View Basic Text Stats | Overview of general text statistics, e.g. the number of words and sentences, their average lengths, lexical density and the distribution of pronouns |
| Unincorporate file | Removes the file of your project, but it is still displayed as a file of your corpus, not completely deleted. |
| Clean MS chars | Removes special MS chars, e.g. unprintable chars. |
Table 1: Options
The content of your files can be displayed by simply clicking on the respective file name.
4.2 Add an annotation
The UAM Corpus Tool calls an annotation a layer. The first step implies clicking the button Add layer. After you have entered a name for your layer you have to categorize it. The four options are:
| Category | Description |
| Annotate Document | Assigning features to the file as a whole, e.g. document type or genre |
| Annotate Segments | Annotating parts of the texts |
| Automatic Grammar Analysis | Automatic annotation of syntactic relations using the StanfordParser; only provided for English data |
| Rhetorical Structure Annotation | Basic annotation in terms of Rhetorical Structure Theory (RST), help window provides further information. |
Table 2: Different Types of Layers
To introduce these functionalities different layers are created for the first three categories focusing on the annotation of segments. This category is is described in detail.
4.2.1 Layer for Annotation of Segments
For the creation of a layer for different types of participants, the category Annotate Segments has to be selected.
Besides the possibility to create a new scheme numerous already created schemes are provided, for example to annotate clause types (e.g. relational or verbal) or different types of registers.
A graphical tool is provided to generate a new scheme. The schemes are organized hierarchically. You can edit them by clicking on the given features (Screenshot 5). A comment can also be associated with a feature to explain its function by clicking on the respective feature and selecting Add gloss.
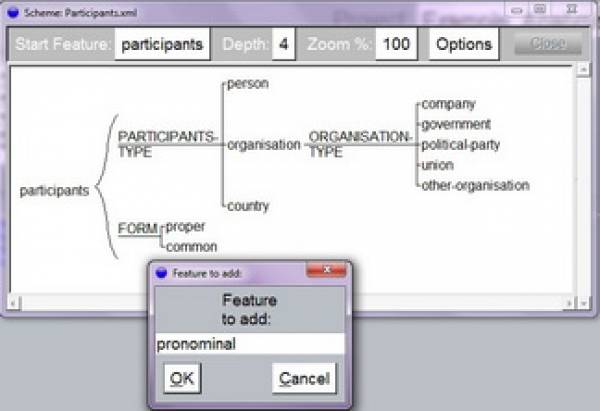
Screenshot 5: Generating Coding Scheme
Now, you can apply your annotation scheme on your corpus by clicking the button labeled after the name of your annotation scheme next to the single text files (Screenshot 6).
Screenshot 6: Annotation Window
At first you have to select a text segment by swiping the mouse over the text. The beginning and end of your selection can be changed by dragging the end of the segment to the correct location. Different segments can be overlapping. The selection of text segments can be described as a little tricky, because you have to be very precise. Although you can delete selections there is no explicit functionality to “undo” your latest actions.
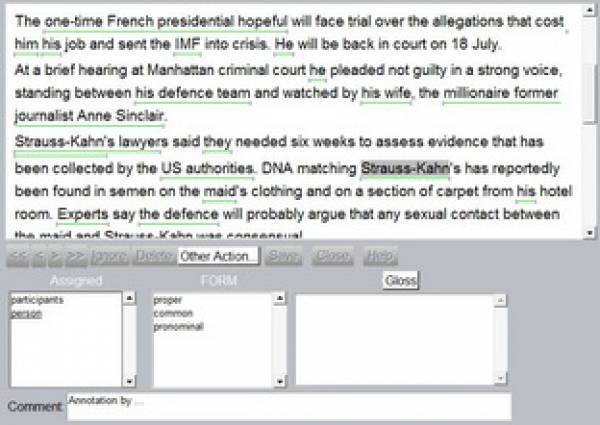
Now, you can assign features of your annotation scheme to the green highlighted text part by double-clicking on the appropriate feature in the box in the middle. You can correct your choice and delete an already assigned feature by double-clicking on it. There is also a possibility to add a comment for a single annotation, for example to explain or discuss single annotations. This can be useful in collaborative or complex and lengthy projects. You can have a look at your annotations by clicking Other Actions > Show Text Stream (Screenshot 7) and Other Actions > Show Text Structure.
Screenshot 7: Text Stream
After you finish the annotation and close the annotation window the button next to the text file changes colour into a light blue. This is useful because you get an overview of already annotated files.
4.2.2 Annotating the whole Document
In a next step, we create a new layer called Language to specify the language the texts are written in. The option Annotate Documents has to be selected and a new scheme has to be created (Screenshot 8).
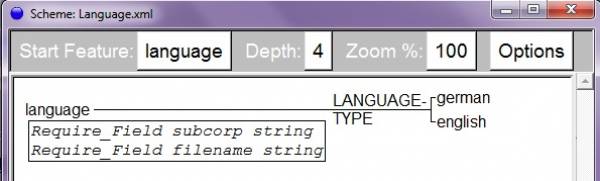
Screenshot 8: Annotation Scheme Language
The annotation of the language can be used later for the analysis of features occurring in newspaper articles depending on their language.
4.2.3 Automatic Grammar Analysis
Such a layer allows the automatic detection of syntactic relations using the Stanford Parser, which currently is only provided for English data. You have to specify a name, select the option Automatic Grammar Analysis and finish the process by clicking Finalise. Then, a window displaying the message “To support automatic clause segmentation, a layer 'STNDParser' is being created for you” opens, which you have to confirm. As a result two new layers called Parser and STNDParser are created.
If you try to apply this new layer on one of your texts the Stanford Parser will be downloaded automatically once and your text is annotated. Via the annotation window you can check the process and correct eventually false tagged segments.
4.3 Corpus Search
You can query your corpus with the button Search. Coded features can be searched by selecting the feature you are interested in via the query box. As an example, we query all text segments tagged as participants and click Show (Screenshot 9). You can search for other features of your annotation scheme by clicking on the feature currently displayed and then select another one.
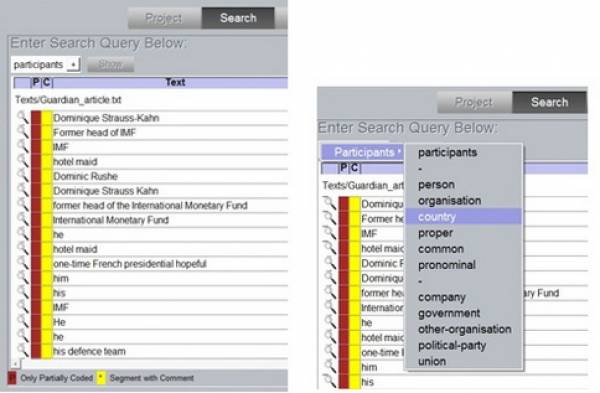
Screenshot 9: Corpus Search
You can explore the context in which the tagged text segment appears in your text by clicking the magnifying glass icon. The symbol P informs you that the respective text segment is only partially coded which means that you did not assign features to all possible annotation levels. This functionality helps you to discover incomplete annotations which you might want to complete later. The yellow box indicates a text segment containing a comment. One advantage of the UAM Corpus Tool is that your search results can be saved as html file or plain text by clicking the button Save on the right side.
The search can be specified by clicking the small +. For instance, you can extend your search by querying strings, segments with combinations of features or segments within another segment type. Using Containing String allows querying patterns. For example, you can find passive clauses with the pattern be% @@participle which will match all segments containing any form of be followed by a participle verb. Concerning the search for patterns you have to be aware that the UAM Corpus Tool does not include POS-tagging. The application includes a large dictionary of English and looks up each word in the dictionary to find parts of speech, for example to detect participles. Currently, this functionality is only integrated for English.
A complete overview of all search functionalities including wildcards is offered after clicking the button Help on the right side.
4.4 Automatic annotation – Autocoding
You can assign features to text segments automatically by using search patterns. These patterns can be defined by the rule editor clicking the button Add.
A checkbox provides three options, you can:
- Search for segments and assign those segments a particular feature
- Create new segments in on layer based on corresponding segments in another layer
- Create new segments in one layer based on string pattern in the text
The first option limits your automatic coding to one layer, e.g. only participants or only language. The second option offers the chance for a combined search whereas the last one focuses on searching strings. For our purposes – the detection of passive constructions in clauses – we choose the first option. Hereafter, a window opens for editing the respective search (Screenshot 10).
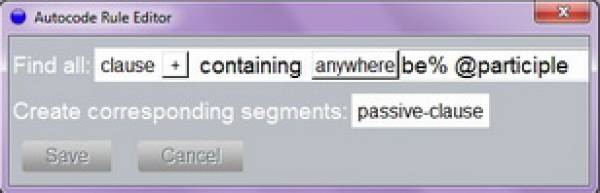
Screenshot 10: Autocode Rule for Passives
This query means searching for all segments annotated as clauses (feature of layer Parser) which contain any form of be followed by a participle verb. The results of this search should be coded as passive-clause (feature of layer parser)
The new rule can be saved and applied by clicking Show. The query requires a lexicon for each language which is yet not provided for German. Hence, the results (Screenshot 11) can only be displayed for the English newspaper text.
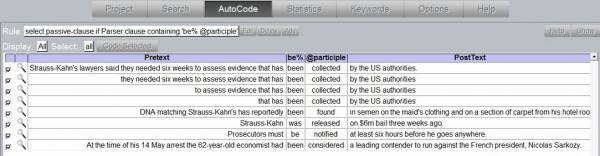
Screenshot 11: Autocode Results
You can correct wrongly annotated constructions (e.g. the duplicate detected first three examples) by unchecking the tick in the box on the left side. All selected phrases are finally coded as passive-clause by clicking Coded Selected.
Further information, for example, concerning the syntax of more complex queries is provided in the manual and under Help.
4.5 Using UAM for Statistical Analysis
The section Statistics allows you to analyze your annotated data without the export to external statistics software, e.g. Excel. Furthermore, tests in terms of level of significance are included which helps to get reliable information whether observed differences could be described as significant or random. To analyze your data you have to decide what should be compared in which manner. The options are displayed in table 3 and 4.
4.5.1 What can be compared?
| Data | Description |
| Describe dataset | Presents means and frequencies for the corpus as a whole or a specified subcorpus, e.g. text length and text complexity. |
| Compare two datasets | Comparison between data of subcorpora, including tests for statistic significance (t-test and chi-square-test) |
| Describe multiple files | Presents statistics for single files in a corpus. |
Table 3: Types of Studies
4.5.2 Types of Statistical Analysis
| Type | Description |
| General text Statistics | Provides basic statistics of the corpus, e.g. total number of annotated segments, number of words per segment, for English text, lexical density and the distribution of pronouns is displayed |
| Feature Statistics | Concentrates on the distribution of features with which you have tagged your data. Shows frequencies and mean, shows also level of significance using t-test and chi-square-test if you compare two datasets. |
Table 4: Types of Statistical Analysis
4.5.3 Example Analysis
For the purpose of illustration, our two newspaper articles annotated in terms of participants can be analyzed by using General Text Statistics. Table 5 displays that both texts share the same number of segments tagged as participants. A higher average word length can be observed in the German article but pronouns are more frequently used in the English article (1p and 3p Reference in Table 5).
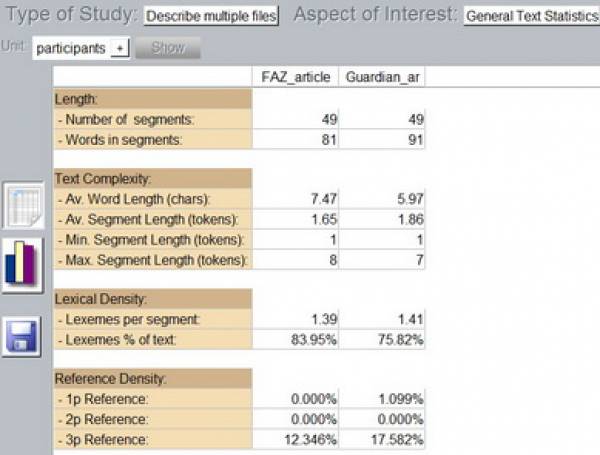
Table 5: General Text Analysis for Multiple Files
Another analysis (Table 6) compares the distribution of the different types of participants occurring in the German and English article. To get frequencies for the different participants you have to select Feature Coding and participants as Unit. The Type of Study is Compare two datasets. Tests for statistic significance are only applied on this type of study. The respective languages, which you want to compare, have to be chosen to specify Set1 and Set2.
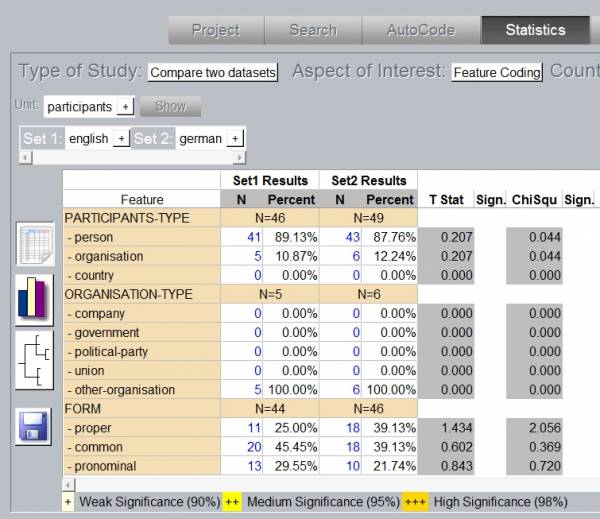
Table 6: Feature Analysis for Two Datasets
Slight differences can be noticed. The German newspaper article contains more segments tagged as participants concerning all types of the category. The results of the two tests of significance are listed next to the frequencies. Both values are not significant which means that the differences can be described as accidental.
The level of significance (Sign.) would be indicated by the icon + next to the test values. The included tests for statistical significance are very useful but the differences of the t-test (T-Stat) and the chi-square-test (ChiSqu) have to be considered for the interpretation of the results. The t-test can be applied to compare means and the chi-square-test for frequency counts. As our study deals with frequency counts of participant types only the results of the chi-square-test are relevant for our example analysis.
This example shows that the Statistics box of the UAM Corpus Tool is a useful resource but basic knowledge about statistics and the structure of your data are essential to interpret the results correctly.
You can also generate chars to visualize your data by clicking the chars-icon on the right side. Furthermore, statistics can be saved as plain text or html document by clicking disk-icon on the left side.
4.5.4 Exploring the Data
In addition to a statistical analysis the UAM Corpus Tool offers another possibility for investigating the characteristics of your data: the Explore window. At first, you have to make a decision concerning the source of your data: By selecting Unit you can search for features specified in your annotation layers. A subcorpus or a single file can be analyzed by choosing Text.
Several options are provided as aspects for your analysis, displayed in table 7:
| Aspects for Analysis | Further Options |
| Lexis | Choice between word counts, keywords, subjectivity (for English only), phrases (phrase length between 2-6 words can be specified) |
| Features | Feature Frequency (counts of features), Key Frequency (most frequent features compared to reference data (rest of the corpus, another subset or another UAM Corpus Tool-project) |
Table 7: Different Aspects for Analysis
The results can be listed in various forms:
- listed in a table,
- visualized in a word cloud,
- text flow, text highlighted by changing color and font-size, only for single texts,
- heat diagram which shows the distribution of features throughout a text, only for single texts.
Screenshot 12 shows the results for a word cloud choosing the option Text for the FAZ article with WORD Counts as Aspect of interest.
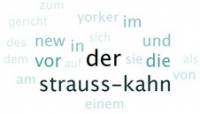
Screenshot 12: Word cloud
The UAM Corpus Tool provides numerous functionalities for manual or semi-automatic annotations. Annotated files and coding schemes are saved in the platform independent XML-format which means sustainability. Furthermore, it allows statistical analysis and organizing your data and annotation schemes effectively.
5 Summary
The UAM Corpus Tool provides numerous functionalities for manual or semi-automatic annotations. Annotated files and coding schemes are saved in the platform independent XML-format which means sustainability. Furthermore, it allows statistical analysis and organizing your data and annotation schemes effectively.
6 Video tutorials and How-to on using UAM Corpus Tool
UAM Corpus Tool video tutorial part 1 (English)
UAM Corpus Tool video tutorial part 2 (English)
Specific functionalities of UAM Corpus Tool
 Except where otherwise noted, content on this wiki is licensed under the following license: CC Attribution-Share Alike 4.0 International